
Jun 9, 2013
Jun 7, 2013
Wire wrap: Life of tree

What you need:
- 0.25 mm semi-hard brass wire
- 0.65 mm brass wire
- Chain Noise Pilfer
- Wire cutter
- Scissors
- Other semi-precious stone chips
- 50cm bronze chain to
- Terminal end of the chain

Step 1: take the thick bronze wire and wrap it with the chain
noise pile and make an input for the chain.
Step 2: the caught double-thick bronze wire will be the vase
of the medal; you need to wound around with the thinnest wire to make more
resistance and start the tree.
Step 3: Cut off 10 pieces, 10 cm wire of the 0.65 mm .
Step 4: take these pieces and fix to the frame after roll
all together over, that form will represent the trunk of the tree.
Step 5: take the wires and separate it in 2 by 2 wires and,
Step 6: add one
semi-precious chips and fix it with another wire; after that, repeat the step form the tree by
own imagination.
Step 7: the wire remains from the chips role over the frame
and fix the upper part of the tree.
Step 8: put the chain in the medal and the necklace is done!

Have a nice and creative weekend!
Jun 3, 2013
A fairy night
We were all raised surrounded by fairy tales and stories. Every little girl dreams to become a princess when their grow up, until reality hits.
.jpg)
The tragedy of adulthood strikes when losing hope in a dream and letting the conscious mind take over.
With time passing by, we try reality and we let the fairies slip away from our imagination. Being more realistic doesn’t make you more grown up; it makes your dreams forgotten.
Yet, one day life gives you back that moment, like a punch in your face, when you fall in love, like you never been and makes all fairy tales a reality.


This story was written for my one night of fairy in the Teleki Castle, the night which made me feel a princess for one night.
Those who contributed to this photo shoot:
Design: Mathe Annamaria
Hair/MUA: Emoke Csernaczki
Photo: Kovacs Levente
May 31, 2013
Turquoise Spiral Earring
Hello my readers! Here is a little DIY for you as I promised!

Tools and ingredients:
- Chain noise plies (wrapped with pliers)
- Wire cutter (cutters)
- 2 semi-precious stone beaded turqouse
- 1.5-2mm aluminum or copper wire
- 0.25 mm aluminum wire
- 50 cm 3-6 inch cutting chain cuts
- 2 piece bronze hangers for the ear

Step 1: Wrap the thick wire and make little spiral shape for the hanger that we will add the chain in the end.
Step 2: Wound around the thinner wire and start at the bottom of the spiral wire; after that make a good sustain for the pearl.
Step 3: With the thin wire sustain introduce the pearl and adjust the wire frame.
Step 4: After you introduce the pearl in the frame, start making a new spiral form design in the bottom.
Step 5: At the bottom of the spiral we introduce with a little help of the thin wire the
Step 6: the upper districts of the earring comes the wire clip.

While writing this tutorial I have realized that you can do more with your own imagination with semi-precious or plastic pearls.
I prefer to use the semi-precious stones because of their pattern, color and light, some semiprecious pearls are too elegant but adding wire it makes it more daily wearable.
In each execution of the wire the design is modified so there is no pattern for this kind of preparation mode. The length of the chain is not stable you can use longer or shorter ones. The ending of the chain can be left like this ore you can add some pearls at the end.
The result is wonderful, you can use as a week day earring or an elegant accessory.
Have a nice weekend and enjoy your free days! Don’t forget to push the like button, if you have questions just hit the ASK bar. This tutorial was prepared for you by AngelBijou. If you want to order something from her just click here and leave a message.
May 27, 2013
The dark queen of the forest...
The dark queen of the forest...

There is a story of Gods and people.
Back in the days when the world was ruled by gods and goddesses, was a queen who borne on this world with a face of a goddess to protect all the forests of the Earth. With time the gods lost their power, because humans turned their backs on them. They were simply forgotten.

The Queen of Forests remained to stay on this realm to protect the forests. She was hoping that humans would start to believe again. But with time humans started changing more and more, destroying and building anew. Creating a new environment more comfortable to them, not respecting the one already given: nature. Each cut in a three by the humans made her suffer greatly, day after day. She felt hopeless and powerless against these creatures. She became darker and angrier with time passing.


She promised that one day when the humans will cut off the last trees she will raze and show her face to the world. “I, the Dark Queen of Forests, shall reveal my face and power to the world and I shall punish your children with endless pain to give back all the sufferance I felt all this time, with each cut in my precious trees. I shall let humans bleed out and watch them die like they did with my children.”

This story was created as an announcement for those who don’t protect the forests and green areas.


On this story worked :
Designer: Mathe Annamaria
MUA: Gina Bordas
Hair: Markos Ildiko
Model: Keseru Ildiko
Photo: PillanatVaszas
May 26, 2013
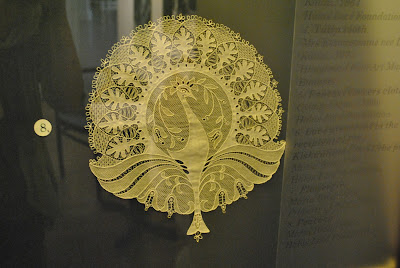
100 old lace

Lace is an openwork fabric, patterned with open holes in the work, made by machine or by hand. The holes can be formed via removal of threads or cloth from a previously woven fabric, but more often open spaces are created as part of the lace fabric. Lace-making is an ancient craft. True lace was not made until the late 15th and early 16th centuries. (WIKI)
Embroidery of garments was universal in the middle ages. To obtain the desired effect, gold or silver thread and silk were applied to contrasting colors Nowadays lace is often made with cotton thread, although linen and silk threads are still available. Manufactured lace may be made of synthetic fibres.
There are many types of lace, classified by how they are made.

In the late 16th century there was a rapid development in the field of lace. There was an openwork fabric where they achieved combinations of open spaces and dense textures form designs. These forms of lace were dominant in both fashion as well as home décor during the late 1500s. For enhancing the beauty of collars and cuffs, needle lace was embroidered with loops and picots.


Since the 16th century, needlepoint lace has epitomized luxury and elegance. Although it most likely developed in Italy for ecclesiastical use, it was soon exported throughout Europe and produced in several places. Needle lace became an essential part of every 17th century court costume -- male and female -- and elaborate ruffs, collars and cuffs appeared in endless European portraits. Its most serious competition came from the bobbin lace of Flanders, and that primarily in the 18th century.
Back in those days lace was more personalized and unique. Women used lace as a character of their personality, if the lace had complicated in forms or design it meant that person had fortune.


The design of the Lace always followed the prevalent style of the ornamentation of the day. Lace works are different by execution and time, like: linen and embroidery cut work, darned netting, drawn work, knotted lace, plaited lace, etc.

Lace today:

I hope you liked my little documentation. If you have questions for us don't forgot to live one at the ASK bar.
Embroidery of garments was universal in the middle ages. To obtain the desired effect, gold or silver thread and silk were applied to contrasting colors Nowadays lace is often made with cotton thread, although linen and silk threads are still available. Manufactured lace may be made of synthetic fibres.
There are many types of lace, classified by how they are made.

In the late 16th century there was a rapid development in the field of lace. There was an openwork fabric where they achieved combinations of open spaces and dense textures form designs. These forms of lace were dominant in both fashion as well as home décor during the late 1500s. For enhancing the beauty of collars and cuffs, needle lace was embroidered with loops and picots.
Lace techniques:


Since the 16th century, needlepoint lace has epitomized luxury and elegance. Although it most likely developed in Italy for ecclesiastical use, it was soon exported throughout Europe and produced in several places. Needle lace became an essential part of every 17th century court costume -- male and female -- and elaborate ruffs, collars and cuffs appeared in endless European portraits. Its most serious competition came from the bobbin lace of Flanders, and that primarily in the 18th century.
Back in those days lace was more personalized and unique. Women used lace as a character of their personality, if the lace had complicated in forms or design it meant that person had fortune.


The design of the Lace always followed the prevalent style of the ornamentation of the day. Lace works are different by execution and time, like: linen and embroidery cut work, darned netting, drawn work, knotted lace, plaited lace, etc.


Lace today:

I hope you liked my little documentation. If you have questions for us don't forgot to live one at the ASK bar.
Have a nice Sunday!
May 21, 2013
Giveaway
Hello my readers! I have a surprise for
you! It’s giveaway time :D… Are you excited?

SM crew prepared as a giveaway for you a
summer hippy shirt. This outfit is a perfect solution for a daily look or a evening out.
All you have to do is to choose your
favorite Weekly Look outfit and write in a comment where and when you would wear
it.
The contest closes on July 2 and the winner
will be chosen by random.org.
Don’t forget to leave your comments on the
blog or like our fan page here.
Kisses! The Style Mile Team J
Subscribe to:
Posts (Atom)